


| | Next, I wanted to add some pages to my Web site, and set up the links
between all of the pages. FrontPage 2000 makes it automatic to create the
navigation. Here's how I set up navigation on Jake's
site:
- Click Navigation in the Views bar (or select Navigation
from the View menu).
- Click on the page called Home Page. Right-click on it, and rename it
(in my case, I named it "Jake the Puppy").
- To add 3 pages to the site, I then pressed the Insert key 3
times. You will then see the 3 pages added under the home page.
- Right-click on each of the new pages, and then rename them. The new
name you give them is the title that will appear on the top of each page,
and in each navigational button. You will want to keep these names
relatively short. In my case, I named them "Photos,"
"About Jake," and "Great Links."
- Click Folders in the Views bar (or select
Folders from the View menu). Rename the page filenames from newpage to
a more appropriate filename. To do this, just right-click on the file
name, select Rename, and then type the new name.
- Double-click index.html from the Folder List to open it for editing.
- I wanted to have the same navigational elements on each page, and to be
able to update them once and have the changes reflected on all of the
pages. So I used Shared Borders and Navigation Bars to do this.
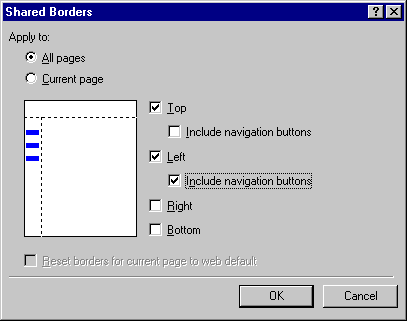
First, select Shared Borders from the Format
menu. Then make selections so that the dialog box looks like this, and
then click the OK button
- Once the shared borders have been applied, you will see navigation links
to the new pages you created on the left side, and a comment on the
top. First, let's add a page banner to the tops of all of the
pages. With your cursor in the comment area on the top of the page,
select Page Banner from the Insert menu, and
then click OK. All of the pages in your Web now have a
graphical banner that uses the text you typed in for the page name in the
Navigation View as the label.
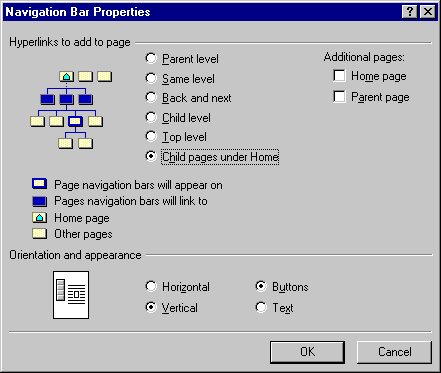
- The last think I wanted to do was change the hyperlinked navigational
items in the left part of the page to graphical buttons. Since I
applied a Theme to the page, the page is already set up to include
buttons. To use them, double-click on the list of hyperlinks in the
left shared border. Make selections so that the dialog box looks like
this, and then click the OK button:
Now all of my pages were linked together, complete with graphical buttons and
page banners, and all I had left to do was to add the content to the
pages. All of this took less than 20 minutes to accomplish.
|
